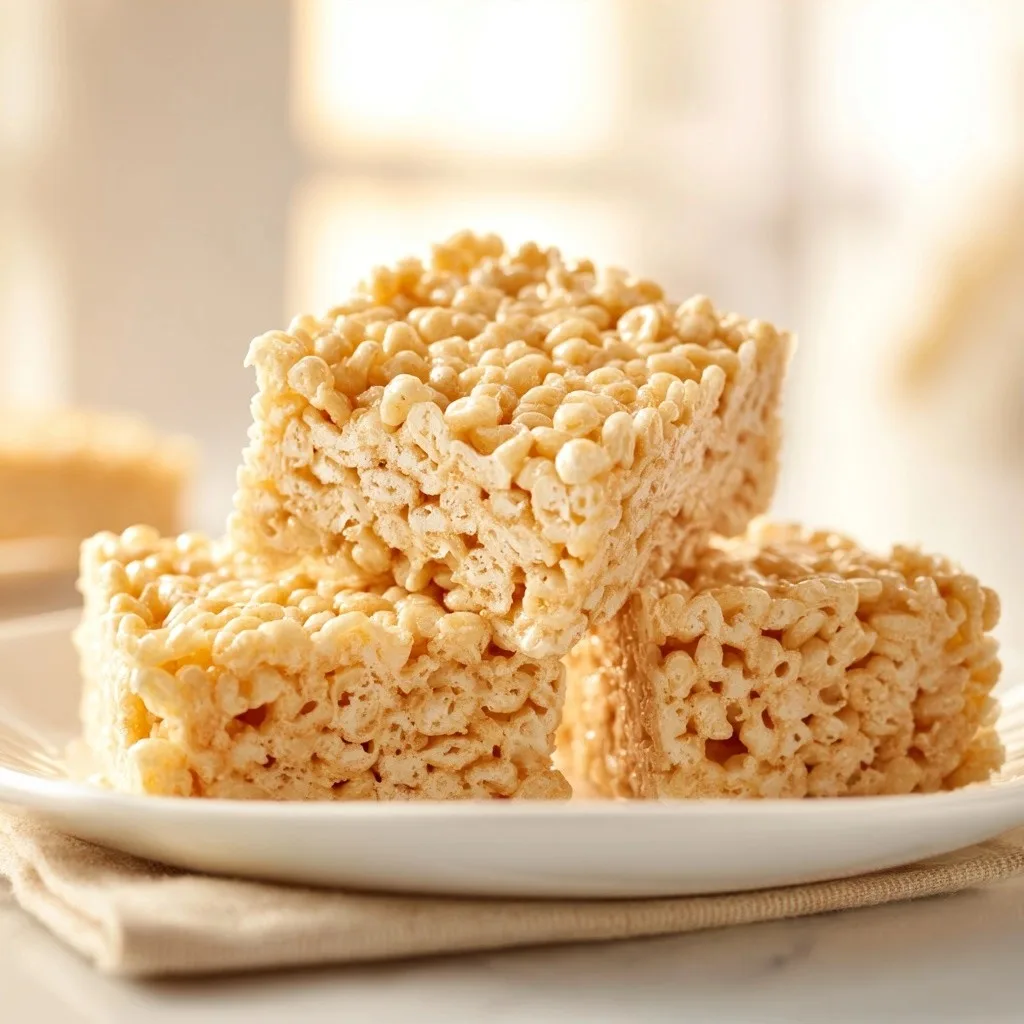
Protein-Packed Rice Krispie Treats for a High Protein Breakfast
“Protein-packed Rice Krispie Treats made with 8 ingredients. Quick and easy to prepare, these treats are perfect for a high protein breakfast. Enjoy!”
The other morning, I was staring at a box of Rice Krispies, wondering how I could turn them into something more nutritious. That's when I came up with my Protein-Packed Rice Krispie Treats. They not only satisfy that nostalgic craving but also give you a hearty boost of protein to kickstart your day.
What sets this recipe apart from the countless others is the perfect balance of flavors and textures. I’ve added a few secret ingredients that make these treats chewy, crispy, and delightfully satisfying, all while packing in that protein punch. You won’t just enjoy these as a snack; they’ll make breakfast a treat!
Why This Recipe Works
Ingredients
What You'll Need
- 3 cups Rice Krispies cereallook for the classic variety for the best crunch; avoid stale boxes for optimal texture.
- 1 cup mini marshmallowsthese melt easily and help bind the treats together; use fresh ones for maximum gooeyness.
- 1/2 cup peanut buttercreamy or crunchy works; choose natural varieties without added sugars for a healthier option.
- 1/4 cup honeyadds sweetness and helps with stickiness; consider local honey for a unique flavor or agave syrup as a vegan alternative.
- 1/4 cup vanilla protein powderthis boosts the protein content; select a flavor you enjoy, as it will influence the overall taste.
- 1/2 tsp vanilla extractpure extract enhances flavor; avoid imitation vanilla for the best aroma and taste.
- 1/4 tsp saltbalances sweetness; sea salt can add a nice crunch and depth of flavor.
- 1/2 cup dark chocolate chipsoptional but recommended for a delicious contrast; choose a high cocoa percentage for rich flavor.
- 1/4 cup unsweetened shredded coconutoptional for added texture and a hint of tropical flavor; make sure it's unsweetened to control sugar levels.
When shopping for ingredients for these Protein-Packed Rice Krispie Treats, opt for high-quality marshmallows and nut butters to enhance flavor. The protein powder not only boosts nutrition but also helps maintain the structure of the treats, making them more satisfying.
Easy Substitutions
- Dairy-free: swap regular chocolate chips for dairy-free chocolate chips — you'll still get that sweet richness, but without any dairy.
- Gluten-free: swap Rice Krispies for gluten-free rice puffs — the texture will be similar, ensuring your treats remain delightful and crunchy.
- Lower calorie: swap honey for a sugar-free maple syrup — it will cut calories but may result in less stickiness, so adjust the marshmallow amount if needed.

How to Make This Recipe
Prep & Mix
In a large mixing bowl, combine 1 cup of peanut butter, 1/2 cup of honey, 1 teaspoon of vanilla extract, and a pinch of salt. Stir until the mixture is smooth and creamy, about 1-2 minutes. This step ensures that the flavors meld beautifully and creates a rich base for the treats.
Add 3 cups of mini marshmallows to the bowl, mixing until they're well incorporated. You should hear the marshmallows softening as you stir. This adds fluffiness to the texture, making each bite delightful.
Fold in 1 cup of vanilla protein powder until evenly distributed. The mixture should look like a thick, sticky dough. If it feels too dry, you can add a splash of water to help combine.
Gradually add 6 cups of Rice Krispies cereal, stirring gently to coat all the cereal. You’ll know it’s ready when the cereal is fully covered in the sticky mixture, creating a smooth, gooey texture.
Assemble & Set
Transfer the mixture into a greased 9x13 inch baking pan, pressing it down firmly and evenly with a spatula or your hands. This helps the treats hold their shape once set, so don’t skip this step!
If you like, sprinkle 1/2 cup of dark chocolate chips and 1/4 cup of shredded coconut on top, pressing them in gently. This adds a delicious crunch and a hint of sweetness.
Allow the treats to set at room temperature for at least 30 minutes, or until they feel firm to the touch. The waiting will be worth it when you bite into that perfect chewy texture!
Once set, cut into squares or rectangles for serving. Enjoy your delicious protein-packed Rice Krispie Treats fresh or store them in an airtight container for up to one week!
Tips & Tricks
Use Fresh Ingredients for Maximum Flavor
Trust me, fresh ingredients make a world of difference in your Protein-Packed Rice Krispie Treats. I always opt for the freshest mini marshmallows and creamy peanut butter I can find. The flavors pop, and the texture becomes delightfully chewy rather than overly sticky or hard. When you use older marshmallows, they can lose their fluffiness, leading to treats that are more dense than delightful.
Don’t Skip Greasing the Pan
One of the biggest mistakes I’ve made was skipping the greasing step. It seems minor, but trust me, it’s a great choice. A well-greased pan allows you to lift out the treats easily, avoiding the dreaded sticky mess that can cling to the sides. I like to use a thin layer of coconut oil; not only does it prevent sticking, but it also adds a subtle flavor that complements the coconut topping beautifully.
Pro Tips
Silicone pans make it so much easier to remove your treats without sticking. I’ve found that they allow for a more even distribution of heat, ensuring a perfectly set texture throughout the batch.
After pressing the mixture into the pan, refrigerate it for at least 30 minutes. This helps the treats firm up, making them easier to cut into clean squares without crumbling.
If you’re adding nuts or dried fruits, fold them in just before the Rice Krispies. This prevents them from sinking to the bottom and ensures an even distribution throughout each bite.
Different protein powders can change the flavor and texture of your treats. I’ve tried vanilla, chocolate, and even peanut butter flavors, each giving a unique twist that keeps things exciting.
Old marshmallows can be hard and chewy, impacting the overall texture. Fresh marshmallows melt beautifully, creating that gooey, tempting consistency that makes every bite delightful.
Variations & Customizations
Flavor Twists
Chocolate Coconut Delight
Mix in ½ cup unsweetened shredded coconut and ½ cup mini dark chocolate chips after combining your peanut butter and honey. The chocolate melts beautifully, creating pockets of rich flavor, while the coconut adds a chewy texture that’s so satisfying. You’ll love how it looks with a glossy chocolate layer on top, making it tempting!
Banana Nut Bliss
Add 1 ripe banana, mashed, and ½ cup chopped walnuts into the mix. The banana gives a natural sweetness and moisture, while the walnuts add a pleasureful crunch. It’s a little softer than the original but offers a comforting, homey flavor that’s perfect for snack time.
High-Protein
Peanut Butter Chocolate Chip Protein Bars
Substitute the ¼ cup of honey with ¼ cup of maple syrup and add an extra ¼ cup of vanilla protein powder. This gives you a denser, bar-like treat that’s packed with protein. The sweetness is balanced with a hint of maple, and the texture is chewy, making it perfect for a post-workout snack.
Matcha Green Tea Crunch
Blend in 2 tablespoons of matcha powder with the protein powder for an earthy twist. The vibrant green color is visually striking, and the subtle bitterness of the matcha contrasts beautifully with the sweetness of the marshmallows. It's an unexpected delight that looks stunning on any dessert platter.
Storage & Meal Prep
How to Store
Room Temperature
These Protein-Packed Rice Krispie Treats can be kept at room temperature for up to 3 days. Store them in an airtight container to maintain their chewy texture and avoid any unwanted moisture.
Refrigerator
In the refrigerator, they'll last about a week. Make sure to let them cool completely before placing them in a container. I recommend wrapping them individually in plastic wrap to keep them fresh and prevent them from sticking together.
Freezer
You can freeze these treats for up to 3 months. For best results, flash freeze them on a baking sheet first, then wrap each one in plastic wrap. Thaw them overnight in the refrigerator or at room temperature for a couple of hours before enjoying. Remember, they'll get soggy on the bottom if you stack them while still warm!
Meal Prep
I suggest doubling the recipe if you have a big family or plan to snack throughout the week. Prep them the night before for a quick grab-and-go treat. Use a shallow, airtight container for storage, and they’ll stay fresh for about 7 days. Reheat in the microwave for about 10-15 seconds to get that gooey texture back!
Equipment You'll Need
Essential
9x13 inch baking pan: This size is crucial for achieving the perfect thickness of your treats. A pan that's too small will make them overly thick and gooey, while a larger pan results in flat, crumbly bars. I recommend using a glass or metal pan; both conduct heat well but metal gives a slight edge in browning.
Spatula: A sturdy spatula is key for mixing and pressing down the mixture evenly into the pan. Silicone spatulas are ideal as they can handle the sticky ingredients without tearing your treats. A wooden spatula works too, but it may require more elbow grease to get everything combined.
Nice to Have
Parchment paper: Lining your pan with parchment makes removing the treats a breeze. It prevents sticking, so you won’t lose half of your delicious creation to the bottom of the pan. Plus, cleanup is quicker, which is always a win in my kitchen!
Frequently Asked Questions
Can I use a different nut butter?
Yes, you can substitute almond or cashew butter for peanut butter. Just keep in mind that the flavor will change slightly, and the texture may vary depending on the nut butter's consistency.
Why did my Protein-Packed Rice Krispie Treats turn out too hard?
If your treats are hard, it might be due to overcooking the marshmallows. Always melt them gently over low heat, stirring continuously to ensure a smooth mixture.
How can I make these treats vegan?
You can easily make them vegan by using dairy-free marshmallows and a plant-based nut butter. Just double-check the labels to ensure all ingredients are cruelty-free.
What’s a good way to add flavor?
Adding a splash of vanilla extract or a pinch of cinnamon can enhance the flavor significantly. You can also mix in chocolate chips or dried fruit for a fun twist!
Can I prepare these treats in advance?
Absolutely! You can make them a day ahead and store them in an airtight container. Just be sure to let them cool completely before cutting to maintain their shape.
These Protein-Packed Rice Krispie Treats have become a favorite snack for both me and my kids—perfect for satisfying that sweet tooth while packing in some extra nutrition. For the best texture, let them cool completely before cutting; trust me, it makes a difference. I can't wait to hear how yours turn out, so be sure to leave a comment or share a photo on Pinterest!
Protein-Packed Rice Krispie Treats
Start your day right with these Protein-Packed Rice Krispie Treats, a delicious and nutritious breakfast option.
checklist Ingredients
- 3 cups Rice Krispies cereal
- 1 cup mini marshmallows
- 1/2 cup peanut butter
- 1/4 cup honey
- 1/4 cup vanilla protein powder
- 1/2 tsp vanilla extract
- 1/4 tsp salt
- 1/2 cup dark chocolate chips
- 1/4 cup unsweetened shredded coconut
menu_book Instructions
- 1
In a large mixing bowl, combine peanut butter, honey, vanilla extract, and salt.
- 2
Add the mini marshmallows to the bowl.
- 3
Fold in the vanilla protein powder.
- 4
Gradually add the Rice Krispies cereal.
- 5
Transfer the mixture into a greased 9x13 inch baking pan.
- 6
If desired, sprinkle dark chocolate chips and shredded coconut on top.
- 7
Allow the treats to set at room temperature for at least 30 minutes.
- 8
Serve immediately or store in an airtight container.
monitoring Nutrition Facts (per serving)
Ratings & Reviews
Be the first to review this recipe!
Leave a Review
Related Recipes

Smoked Salmon and Cream Cheese Cucumber Rounds Recipe

High Protein Hummus Recipe with Crispy Pita Chips
Almond Butter Rice Cake Bites for a High Protein Breakfast
